
❄️ What This Is About#
My pond filter sits outdoors, and it must not freeze in winter, or it breaks. So it needs an insulated housing.
Up front: this housing is a temporary solution. At best it should last a few years and keep the filter frost-free until then. At some point I’ll convert the filter to gravity-fed operation, and then I won’t need the housing anymore. So the goal was never a carpentry project, just a solid, cheap box made of wooden battens and XPS insulation boards, planned quickly and built quickly.
That made it a good test case for one question: how much of this can an AI agent handle today? The answer: almost all of it. From measuring to the CAD model, the manual and the printed parts, all the way to shopping.
🎙️ Measuring by Voice Memo#
It didn’t start with a sketchpad, but with an audio recording. I put my phone on top of the filter, walked around it with a tape measure, and simply dictated whatever the tape showed: length, width, height, the reinforcement ribs, both filter lids, and for each of the 14 pipe connections its height and its distance from the edge.
The recording was transcribed, and from that transcript the agent built a CAD model directly through the FreeCAD MCP server. I could watch my filter come to life in FreeCAD piece by piece: first the body, then the ribs, the lids, then one pipe after another. That was genuinely exciting.
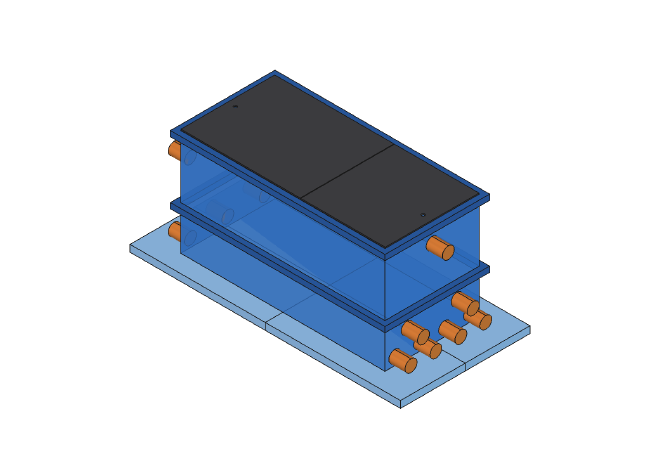
Where the transcript was unclear or contradictory, the agent didn’t just guess. It wrote those values down as assumptions in a separate file listing open measurements. For example, one grip-hole distance came out of the dictation as “8.3” instead of 83 mm. The agent caught that and flagged it as an assumption.
After that I measured the floor slabs the filter stands on and had them added too. On top of those went a frame made of wooden battens, onto which the XPS insulation boards would later be screwed.
🔩 No Metal Brackets? No Problem#
The first design had metal angle brackets at the batten joints, the way you normally would. But I didn’t have any, and I didn’t want to buy any.
So, a single prompt: please optimize away all the brackets.
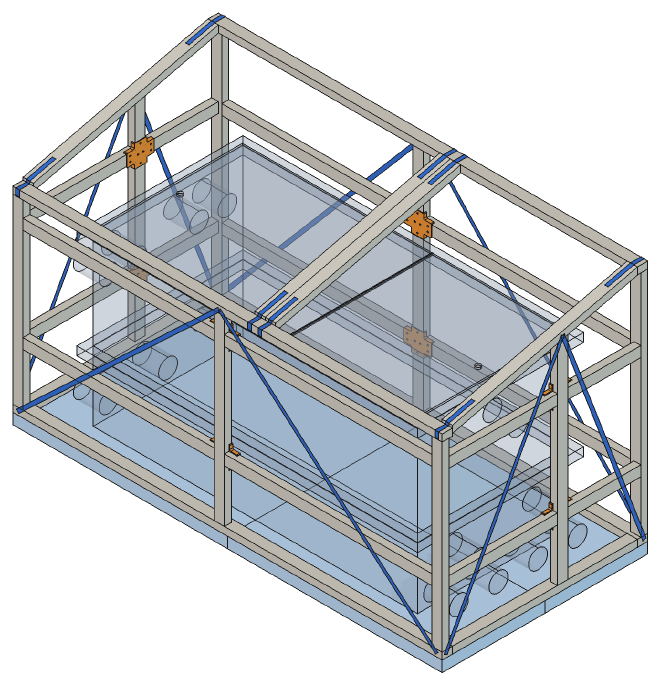
The agent reworked the entire construction: butt-jointed battens with long timber screws, angled screws where needed, perforated steel strap as diagonal bracing, and at the spots where rails meet a continuous post from both sides, 3D-printed cross and T connectors in PETG.
Then came the part I hadn’t even asked for: it modeled the connectors right away in FreeCAD, exported them as STL, and put them in the project folder. All I had to do was print them. Same for the insulation washers used to screw the XPS onto the frame.
📄 A PDF with an IKEA-Style Manual#
For me, this is the real highlight of the project. I asked the agent to put everything together as a PDF. The result was a document of more than 30 pages:
- Bill of materials with quantities, screw sizes, and pre-drilling notes
- Cutting plan for the battens: which part comes from which 5 m length, optimized down to 4 % waste
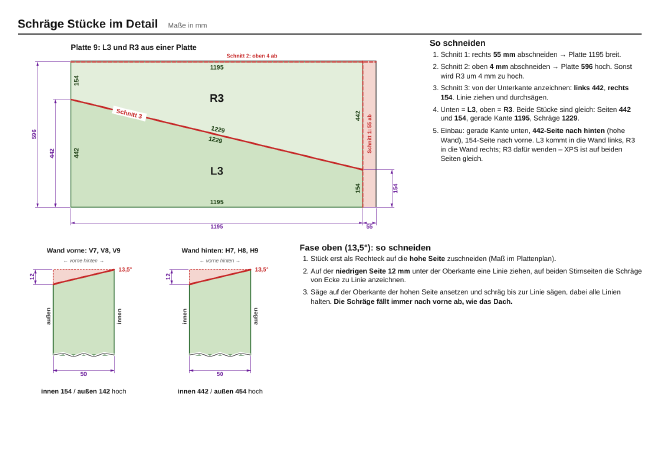
- Cutting plan for the XPS boards, including the angled pieces and bevels in detail
- Views and an A3 drawing
- and an IKEA-style assembly manual, step by step with pictures
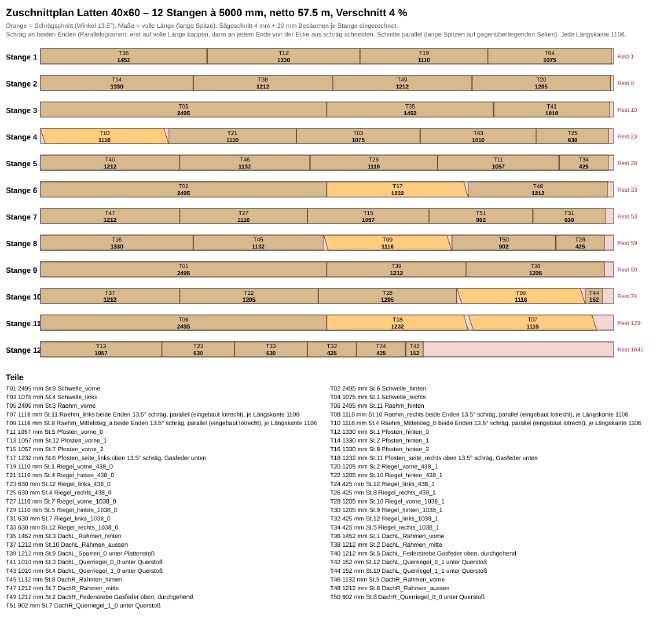
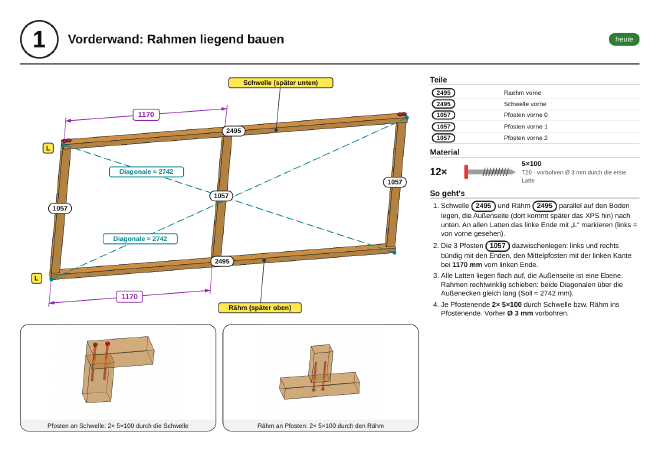
The manual is laid out the way you know from furniture instructions: every step has a big number, a 3D image of the current assembly, the parts needed (battens are simply named by their length, e.g. “1057”), the screws with count and picture, detail views of the joints, and a few short sentences on what to do.
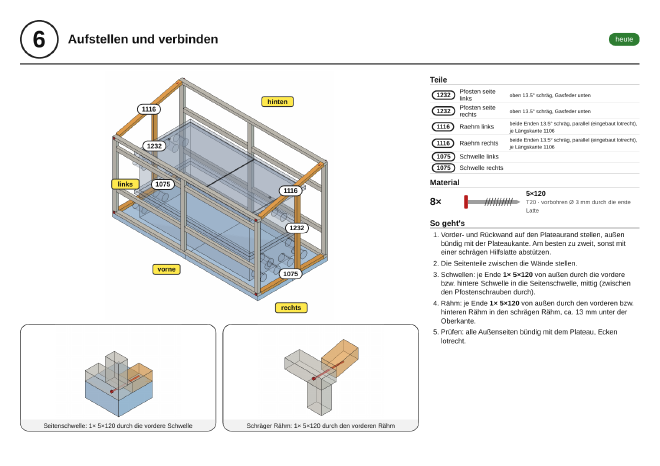
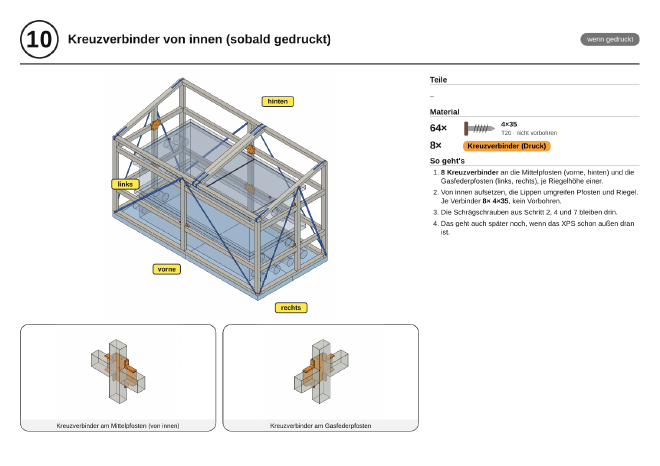
The insulation plan is just as concrete: every XPS piece has an ID, and tricky cuts, like the two angled side pieces that both come out of a single board, are dimensioned individually and come with a cutting sequence.
🛒 Researching Materials and Filling the Cart#
The agent also took care of choosing the materials. It researched online and picked battens, XPS boards, screws, perforated strap, gas springs and hardware with good value for money.
Then I went one step further. I installed the browser extension for Chromium and asked the agent to find every part I needed at a hardware store near me and put it in the online shop’s cart.
That let me check availability right away and reserve everything. Everything was in stock. I paid for the cart online and could pick it up at the store two hours later. The shopping carts were already packed and waiting; all I had to do was load the car.
No endless searching, no price comparisons, no driving around. Nothing forgotten, no second trip, no items you can’t find on the shelf, no tracking down staff to ask. Just drive there and back home.
🔨 The Build: It Fit on the First Try#
Most important first: everything fit on the first try. The battens were cut to plan and labeled with their length, and with the manual, assembly was genuinely easy. Take the battens shown in the picture, lay them out like in the picture, set the screws shown in the picture, and move on to the next step.
The only thing we still had to adjust: a few dimensions were missing from the manual and had to be added. Since every dimension already lives in the model, that was done quickly. All in all, it was just a few minutes of work, for me and for the agent.
🧠 Final Thoughts#
This project was created entirely agentically and is mainly meant as an example of what is already possible today:
- Survey by voice memo, dictated while walking around the filter
- CAD model in FreeCAD, built by the agent through an MCP server
- Construction reworked on request, all metal brackets removed with one prompt
- 3D-printed parts designed unprompted and saved as STL
- PDF with bill of materials, cutting plans, and an IKEA-style assembly manual
- Material research online, with an eye on value for money
- Shopping: cart filled by the agent in the browser, reserved, paid, picked up two hours later
My jobs were: measure, dictate, watch, answer a few questions, pay, pick up, and drive screws. For a temporary solution that only needs to survive a few winters, that’s a pretty good deal.
Have you run a DIY or home-improvement project this agentically yourself? I’m curious how far others have taken it.