
🔥 Why This Project Exists#
My father is passionate about traditional cooking. He smokes fish, makes homemade sausages, and slow-cooks ribs to perfection. These methods all rely heavily on precise temperature control over long periods. Whether it’s cold-smoking fish or leaving ribs in a smoker for 6–8 hours, the temperature must remain within a narrow window. Too hot, and you ruin the meat; too cold, and it might not be safe to eat.
His routine? Walking over to the smoker every 15 minutes to squint at a tiny thermometer. It works, but it’s exhausting.
So when he asked if I could build him something that integrates into Home Assistant, I told him: Say no more. I got you.
🧪 Research: Picking the Right Sensor#
I knew I wanted to use ESPHome for easy integration with Home Assistant. For the microcontroller, the D1 Mini is my go-to for these kinds of DIY projects: reliable, cheap, and ESPHome-ready.
For high-temperature applications like BBQ and smoking, I settled on a K-type thermocouple. These sensors can easily handle temperatures up to ~1000°C, making them perfect for BBQ and smoker environments. But K-type thermocouples output only a few microvolts, so they require amplification.
I chose the MAX31855 amplifier module, which ESPHome already supports out of the box. It reads thermocouple data via SPI and provides accurate temperature readings without the need for manual calibration.
📦 Housing and Durability#
Next, I needed to protect the electronics. BBQ sessions aren’t exactly indoor-safe. My dad often leaves the smoker outside, and surprise showers aren’t uncommon.
I found this fantastic parametric electronics box on Printables. It’s customizable, printable, and fits all the components snugly. Huge thanks to the creator!

🧠 Defining the Specs#
I wanted this to be a standalone, battery-powered device with a clean and modular design. That meant:
- ESP8266-based D1 Mini
- MAX31855 with K-type thermocouple
- TP4056 charger module with built-in protection (DW01A chip)
- 18650 Li-Ion battery, pre-wired for easy swapping
- USB-C connector for charging (because, of course, everything is USB-C now)
- Reliable thermocouple connectors made of chromel and alumel (same metals as the thermocouple itself to avoid measurement inaccuracies)
- Filtering capacitors for power stability
- Voltage regulation optimized for battery operation
⚡ Efficient Power Management#
The D1 Mini typically includes an AMS1117 voltage regulator, which has a dropout voltage of around 1.1V. Since 18650 cells range from 4.2V (full) to 3.0V (empty), the AMS1117 would cut out far too early. I needed something more efficient.
Enter the HT7333-A:
- Dropout voltage: ~100mV at low current (vs. ~1.1V on AMS1117)
- Much lower quiescent current
- Better battery life and more usable voltage range
This change alone lets me use almost the entire capacity of the 18650 cell, increasing run-time significantly.
🪛 Building the PCB#
I wanted this build to feel like a polished product. That meant a custom PCB, not jumper wires and a breadboard.
Key design features:
- 2.54mm pitch headers for all modular components (D1 Mini, MAX31855, USB-C)
- TP4056 soldered down via large custom pads
- Through-hole capacitor placement
- Zip tie mount slots for securing the battery (used a reusable Velcro zip tie)
- All critical connectors securely soldered
- Easy maintenance: if a module breaks, just unplug and replace
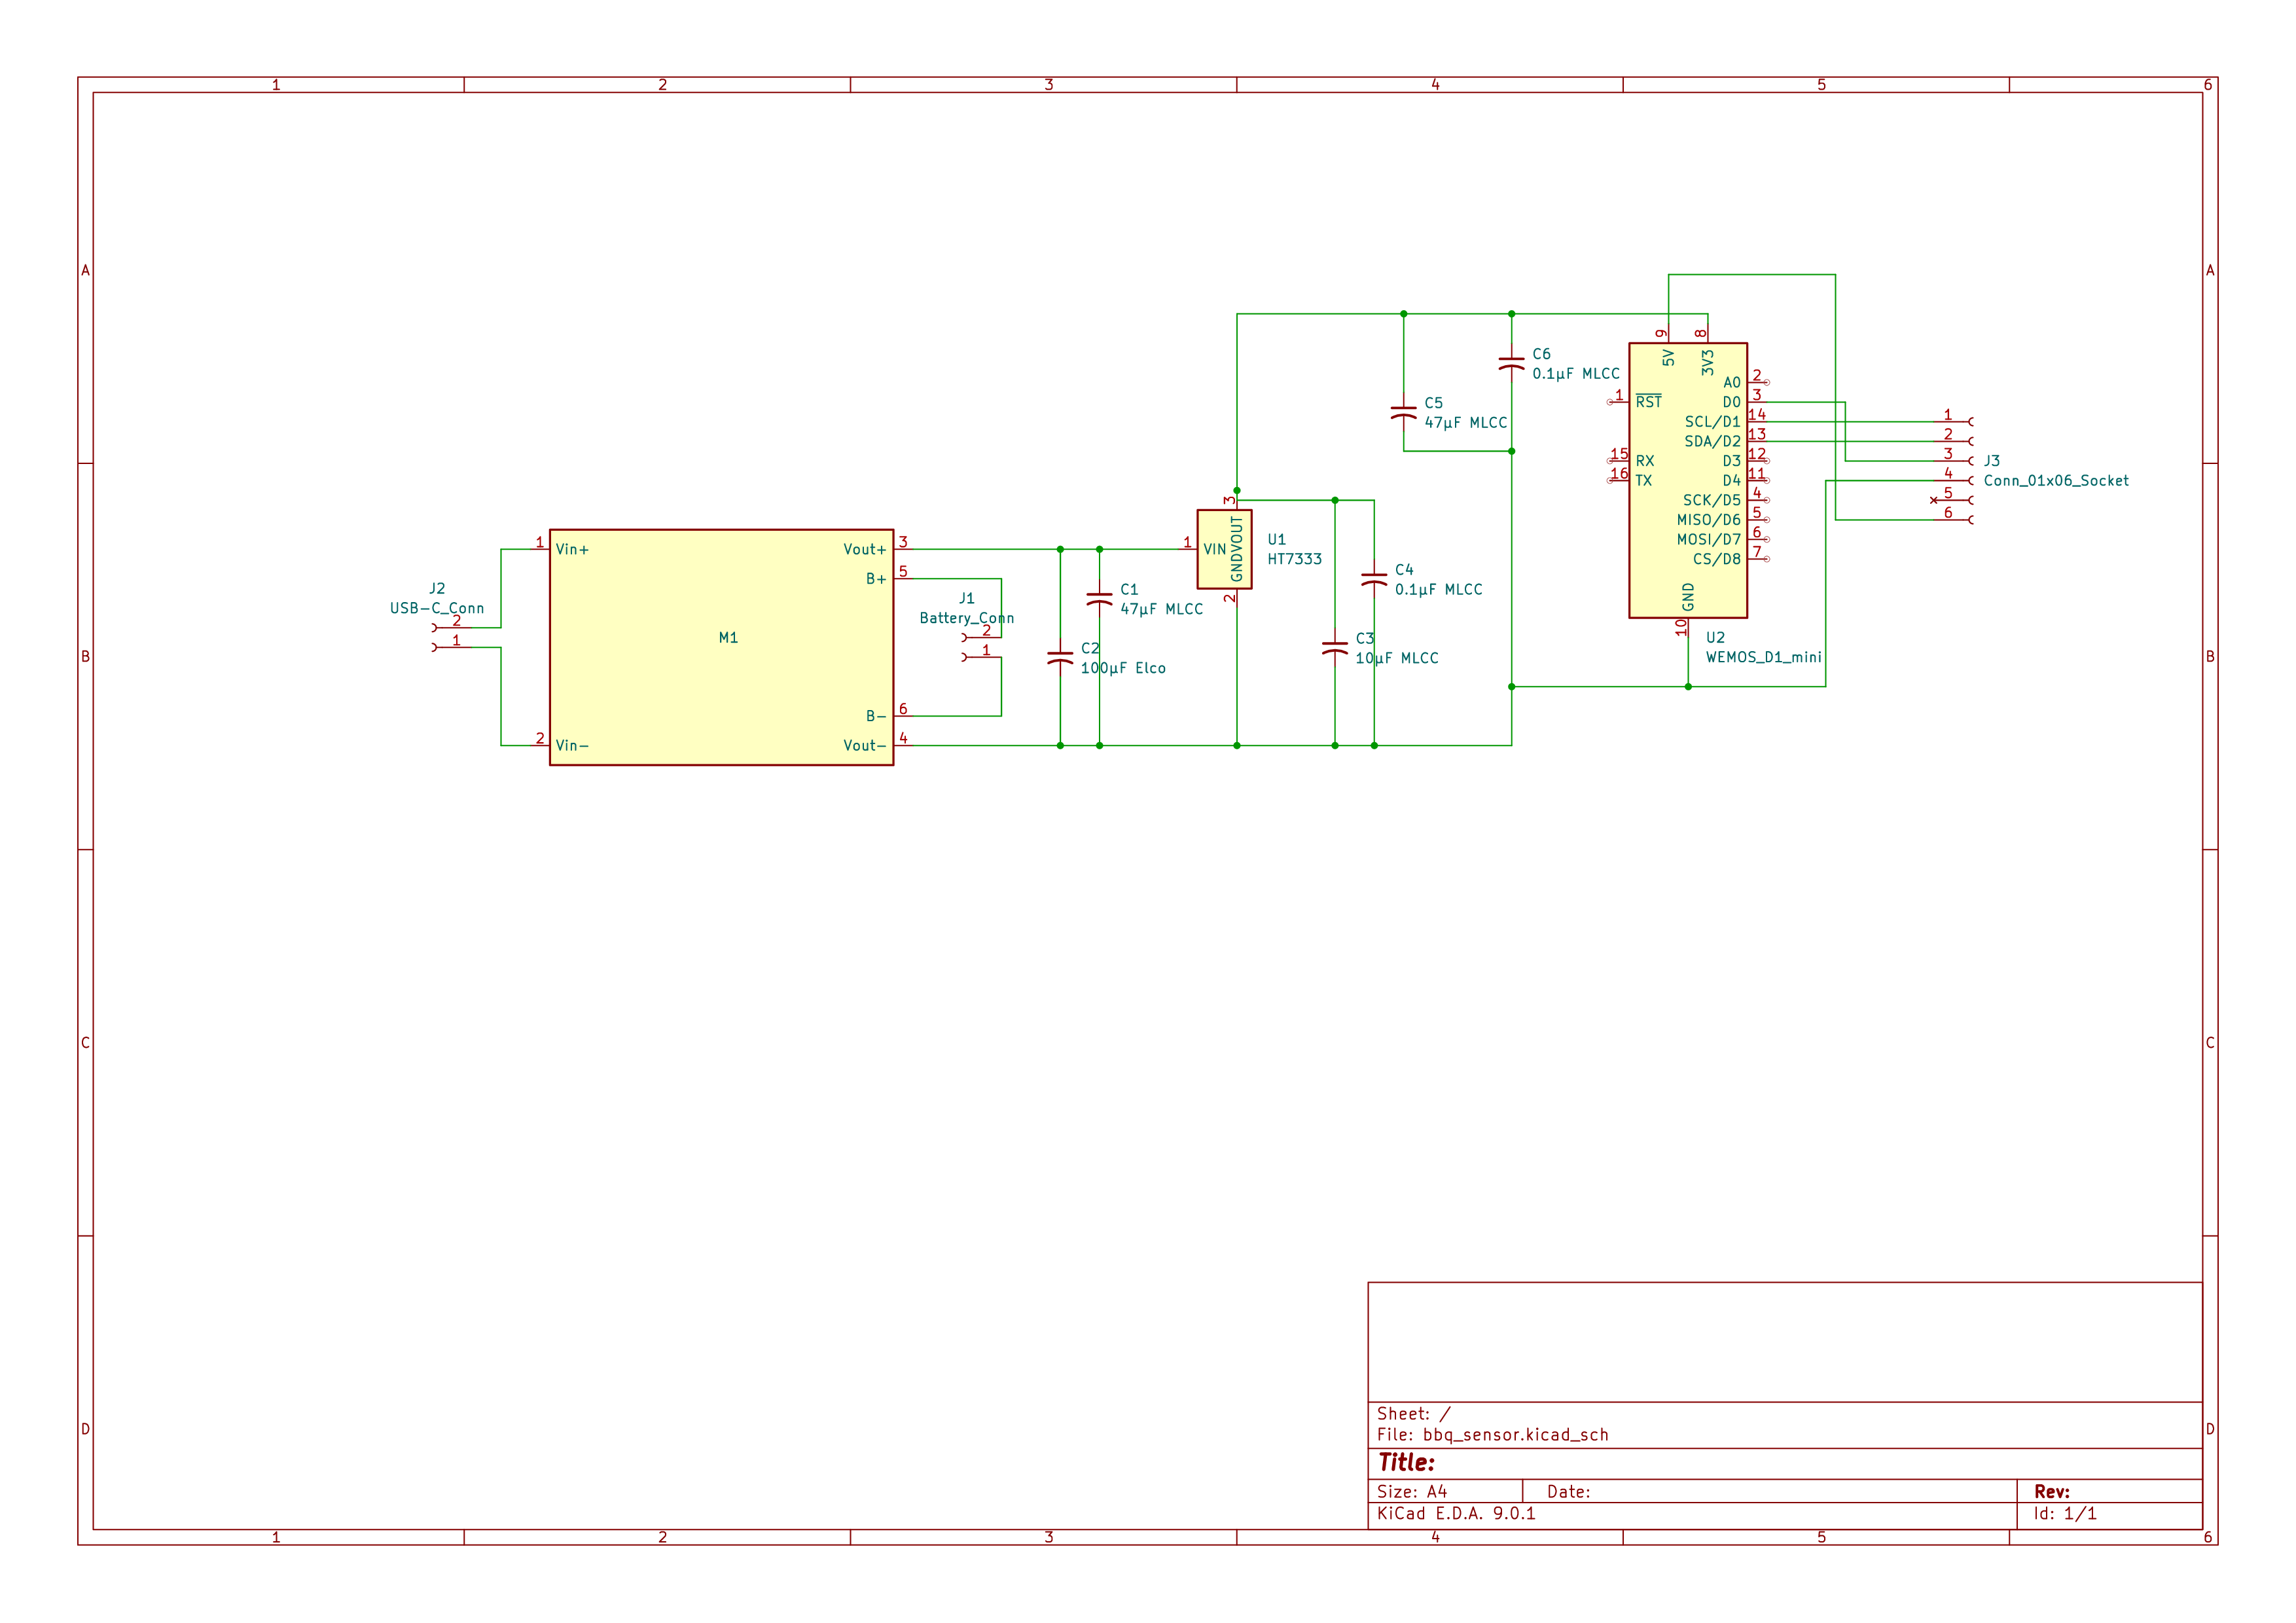
This schematic shows the final design. It’s really straightforward, but it took a few iterations to get right:
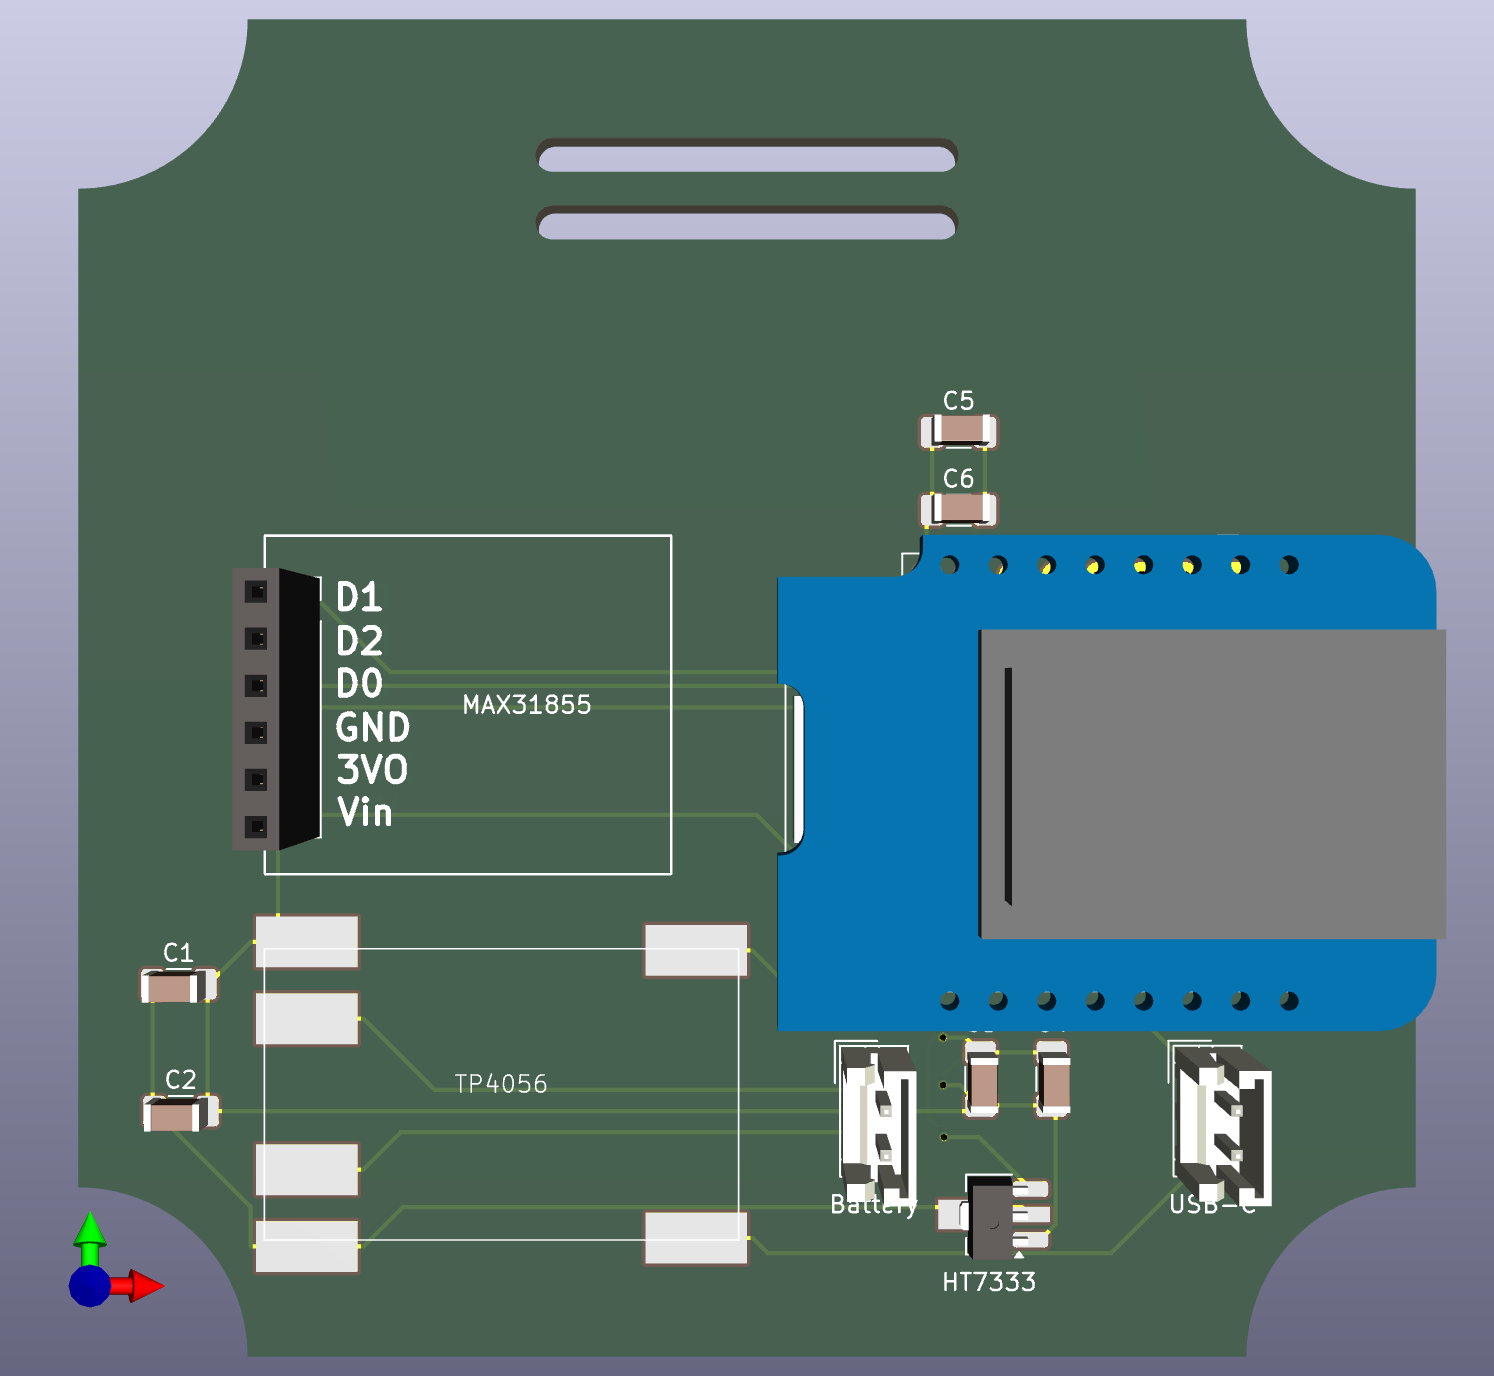
And this is the PCB layout:
🔌 Thermocouple Connector Details#
To keep readings accurate, I used proper mini K-type thermocouple connectors, made from Chromel (Ni-Cr alloy) and Alumel (Ni-Al alloy). These maintain consistency in voltage levels throughout the junction, unlike standard metal connectors, which could distort the readings due to different Seebeck coefficients.
🧪 Testing and Integration#
After assembling the PCB and fitting everything into the case, I flashed the D1 Mini with a simple ESPHome config. As expected, it showed up in Home Assistant right away. Here is a simplified version of the ESPHome YAML configuration I used:
esphome:
  name: bbq
  friendly_name: bbq

esp8266:
  board: d1_mini

wifi:
  ssid: !secret wifi_ssid
  password: !secret wifi_password

spi:
  miso_pin: D0
  clk_pin: D1

sensor:
  - platform: max31855
    name: "BBQ Temperature"
    cs_pin: D2
    update_interval: 10s
At the end it looked like this:

From there, I added:
- A temperature sensor card
- Automation: send notifications when the temperature drops below or exceeds thresholds
- Optionally: set up graphs and alerts via the Home Assistant mobile app

🧠 Final Thoughts#
What started as a simple request turned into one of my most polished and complete builds:
- 🔋 Battery powered (runtime after initial tests: over 30 hours)
- 📡 WiFi connected
- 🌐 Home Assistant integrated
- 🧰 Fully repairable and modular
Most importantly: my dad loves it. He can now monitor the BBQ from his phone, get alerts if the temperature drops or spikes, and actually relax while his ribs slow-cook to perfection.
Thank you so much for reading! If you have any questions about the build, the components, or how to set up ESPHome, feel free to ask in the comments below. I’m always happy to help fellow DIY enthusiasts! If you enjoyed this project, consider checking out my other DIY builds and Home Assistant integrations. Happy grilling! 🍖🔥
Also, i got a few spare PCBs left, so if you want one, just send me a mail and I can send it to you for the cost of shipping.