
🌡️ Steam, Sweat, and Silicon#
There comes a point in every home automation journey where the to-do list goes from “automate hallway lights” to “replace analog sauna controls with a smart board I built myself because I can.”
Welcome to that point.
This is the tale of how I built a custom sauna controller using an ESP D1 Mini, some digital potentiometers, a sprinkle of ESPHome magic, and a glorious excuse to create a custom PCB in KiCad.
Did it smell like burnt flux and victory? You bet. Did it integrate flawlessly into Home Assistant? Eventually.
🔥 Goals & Grit#
I had one mission: take my analog sauna controller (complete with knobs from the Stone Age) and drag it into the 21st century—with smart control, temperature feedback, and automated lighting.
Here’s what I needed:
- An ESP8266 (Wemos D1 Mini) as the brains
- A solid state relay to turn the oven on/off
- Digital potentiometers to mimic the original analog knob
- WS2812b LED strip for ambiance (and time tracking!)
- A person detection sensor (microwave style—because stillness ≠ absence)
- A DS18B20 temperature sensor
- ESPHome integration
- And of course: a custom-designed PCB to pull it all together
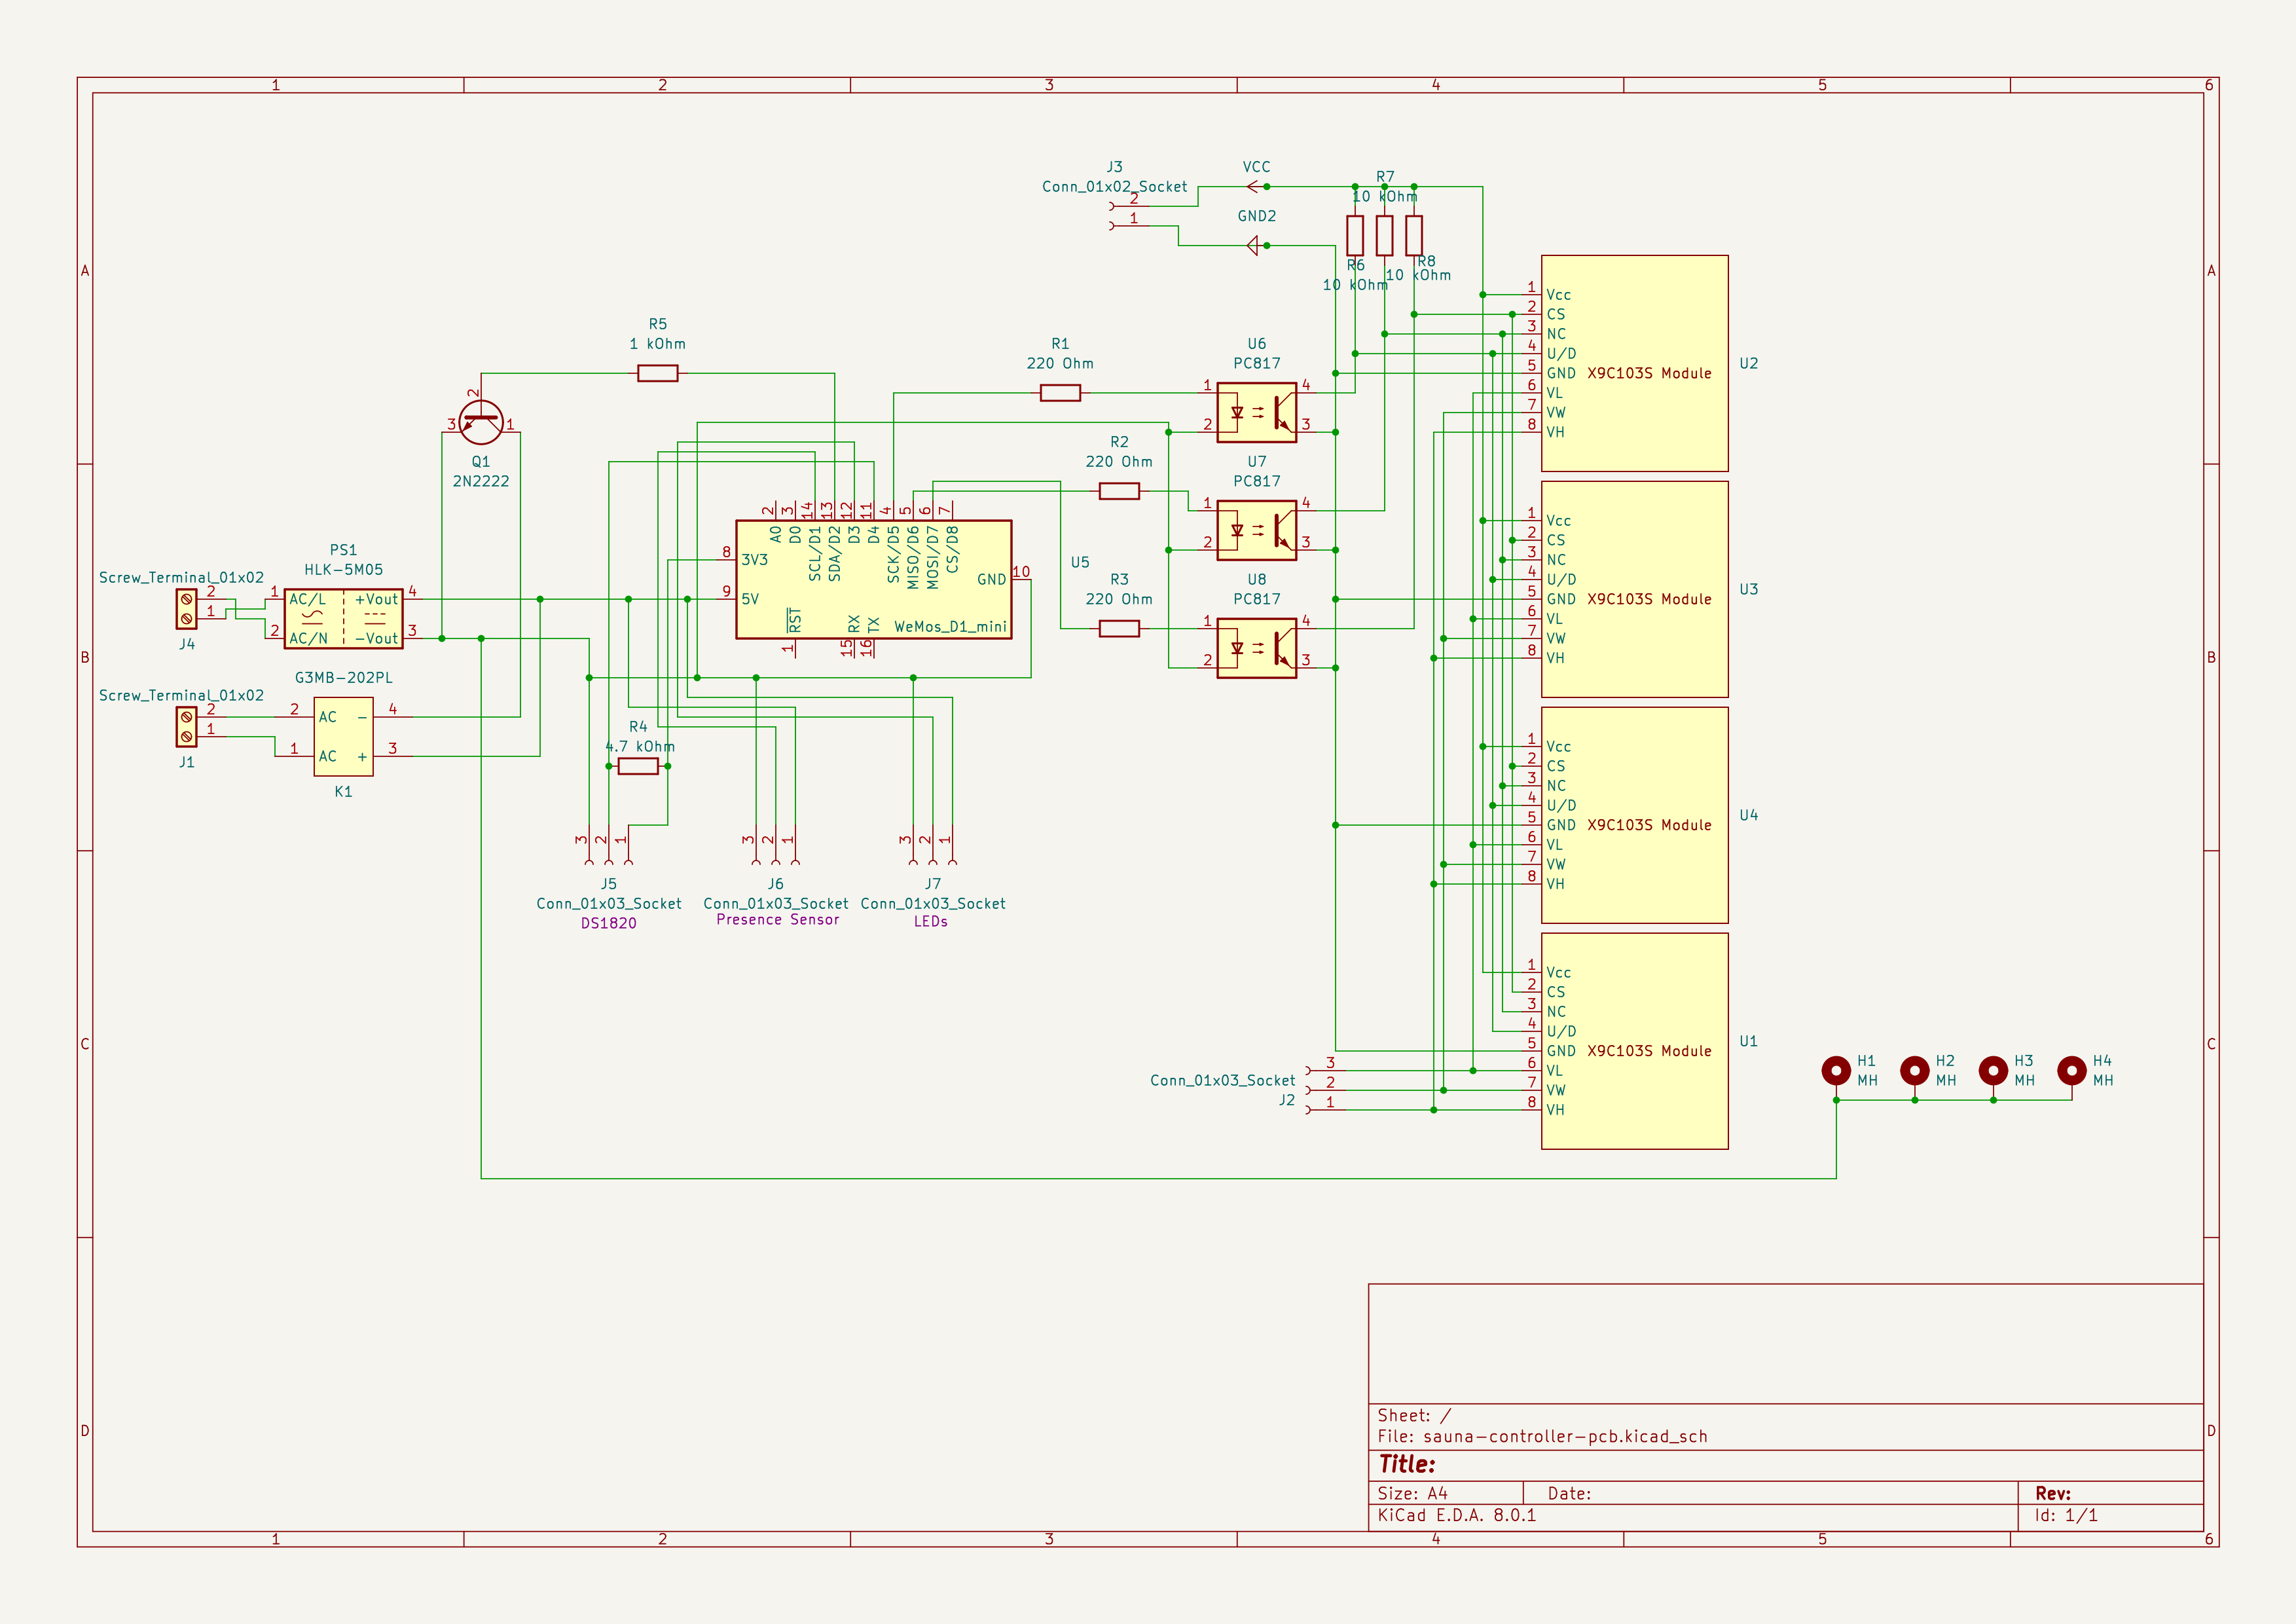
📐 Designing the Board#
This wasn’t just going to be a mess of jumper wires and breadboards stuffed into a sauna control box. Oh no. I wanted elegance. I wanted a proper PCB.
Enter KiCad. A few hours (okay, days) of schematics, footprints, traces, and silkscreen doodles later—boom:
I ordered the board, waited like a kid on Christmas Eve, and then soldered it all together with the patience of someone trying very hard not to bridge SMD pads.
And the result?
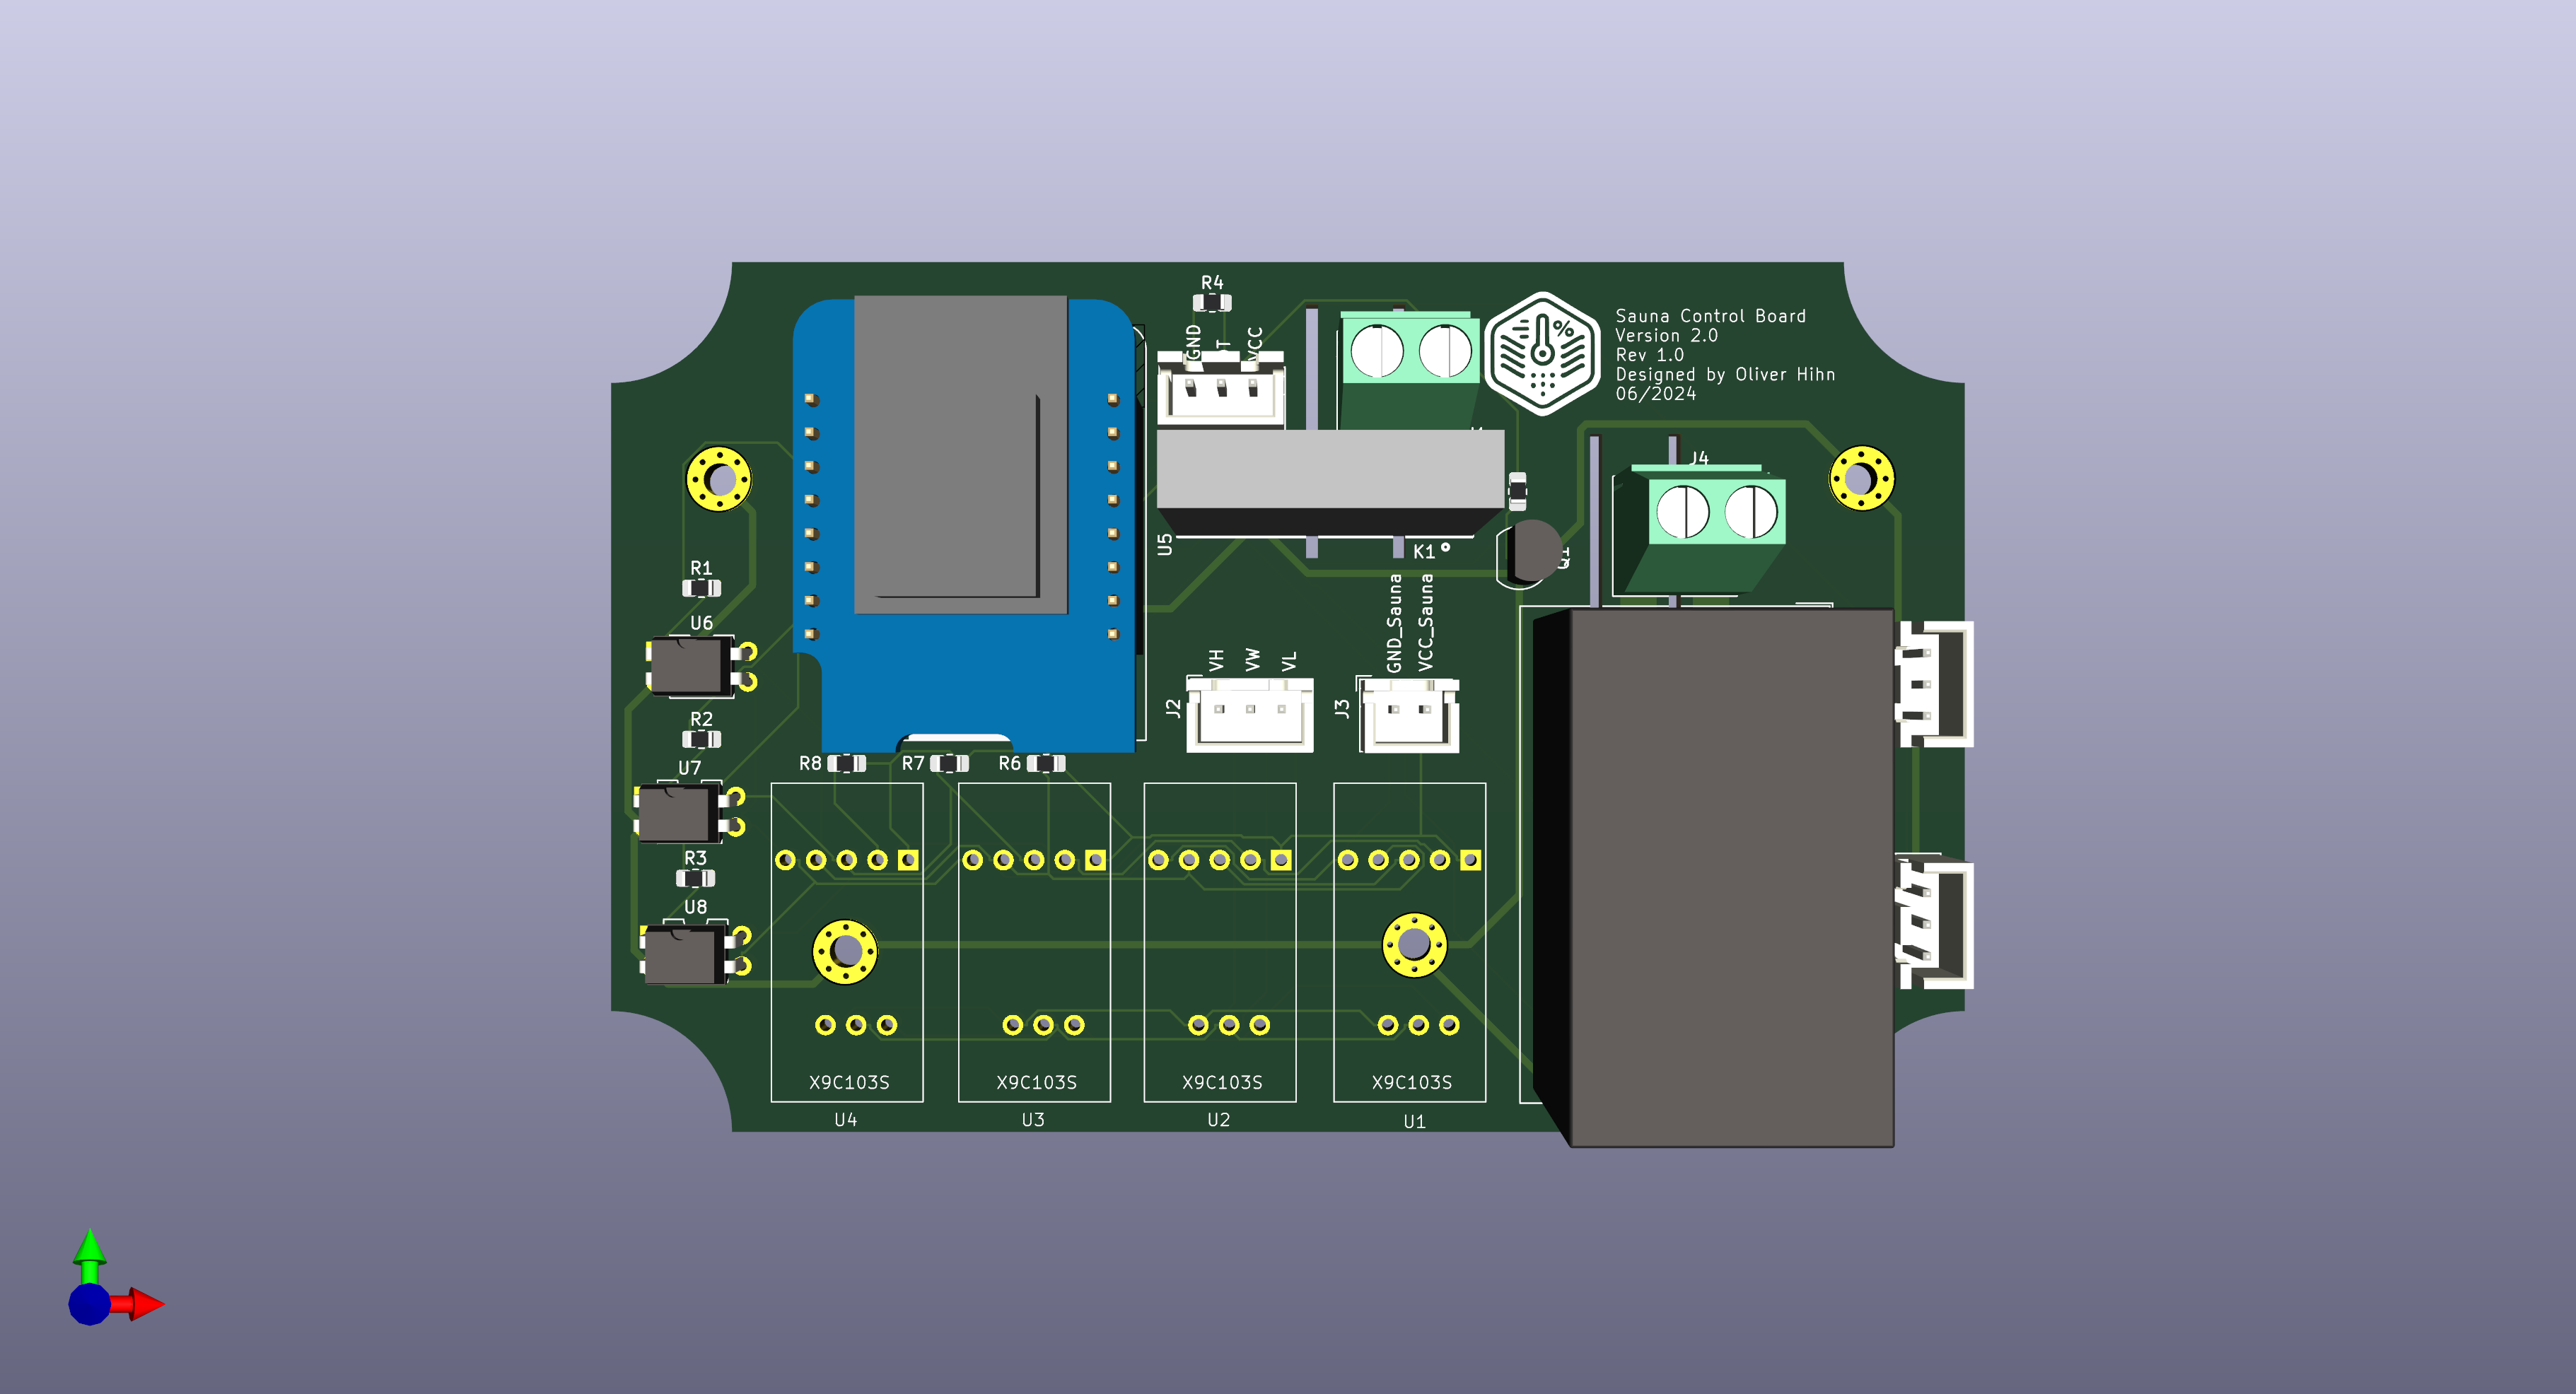
She’s a beauty.
⚙️ Smarter Than Your Average Stove#
The biggest trick was emulating the behavior of the original sauna controller. It used a 2.5kΩ potentiometer for temperature control—simple, but effective. Replacing that meant…
🔁 Using Four Digital Potentiometers in Parallel#
Because, surprise: most digipots don’t go up to 2.5kΩ. But four in parallel? That’ll do the trick. I used the X9C103S series and controlled them via the ESPHome component.
ESPHome, bless its YAML-y soul, didn’t quite support my setup out of the box.
See, I decided to use optocouplers to control the digital potentiometers—not because I had to, but because I could. The original sauna controller had a 5V line that probably had enough juice (my calculations said yes, my gut said maybe), but I wanted full galvanic isolation. So I included a dedicated AC/DC power supply and used optos to make sure my board played nice with the old system without any electrical mingling. Clean. Separated. Respectful.
But here’s the catch: optocouplers are a bit… sleepy. At least compared to what ESPHome expected.
The built-in x9c component in ESPHome toggled the control lines with a default delay of just 1 microsecond between steps. That’s fine for a direct GPIO hookup—but my optos just couldn’t keep up. Through some testing (and a fair bit of squinting at oscilloscopes), I found they needed more like 50–70 microseconds to respond reliably.
So what did I do? I patched it.
I added a new step_delay parameter to the x9c output component in ESPHome, allowing users to slow things down for setups like mine. The default stays at 1µs (so no one else’s config breaks), but now you can set it as high as 100µs. That’s slow enough for even the groggiest optocoupler to get its act together.
So I submitted the PR and it got accepted. 🎉 I even wrote the docs for it because hey, if you’re gonna implement it, might as well document it, right?
Now the feature is out there for everyone to use, and my project works beautifully without hacks—just clean YAML and a little community spirit.
Here’s a peek at the relevant part of my ESPHome configuration:
esphome:
  name: sauna
  friendly_name: sauna

esp8266:
  board: d1_mini

logger:

api:
  encryption:
    key: "redacted"
  services:
    - service: set_pot_value
      variables:
        level: float
      then:
        - lambda: |-
            if (level < 55 || level > 105) {
              ESP_LOGE("custom", "Level out of range (65-105): %.2f", level);
            } else {
              float mapped_level = (level - 55) / 50.0;
              id(x9c_pot).set_level(mapped_level);
              ESP_LOGI("custom", "Setting temperature to %.2f °C (mapped level: %.2f)", level, mapped_level);
            }

ota:
  password: "redacted"
  platform: esphome

wifi:
  ssid: !secret wifi_ssid
  password: !secret wifi_password
  domain: .fritz.box
  ap:
    ssid: "Sauna Fallback Hotspot"
    password: "redacted"

captive_portal:

switch:
  - platform: gpio
    pin:
      number: D2
    name: "Oven"
    icon: mdi:fire
    id: relay

one_wire:
  - platform: gpio
    pin: D4

sensor:
  - platform: dallas_temp
    name: Temperature
    resolution: 10

light:
  - platform: neopixelbus
    pin: D3
    name: "LED"
    num_leds: 235
    type: GRB
    variant: WS2812
    on_turn_on:
    - logger.log: "Light Turned On!"
    on_turn_off:
    - logger.log: "Light Turned Off!"
    effects:
      - addressable_color_wipe:
          name: Visual Timer 1min
          colors:
            - red: 0%
              green: 100%
              blue: 0%
              num_leds: 235
          add_led_interval: 255ms
          reverse: false
      - addressable_color_wipe:
          name: Visual Timer 10min
          colors:
            - red: 0%
              green: 100%
              blue: 0%
              num_leds: 235
          add_led_interval: 2553ms
          reverse: false
      - addressable_color_wipe:
          name: Visual Timer 15min
          colors:
            - red: 0%
              green: 100%
              blue: 0%
              num_leds: 235
          add_led_interval: 3830ms
          reverse: false

binary_sensor:
  - platform: gpio
    device_class: motion
    pin:
      number: D1
      mode:
        input: true
        pullup: false
    name: "person detected"
    id: presence_sensor

output:
  - platform: x9c
    id: x9c_pot
    cs_pin:
      number: D7
      inverted: true
    inc_pin:
      number: D6
      inverted: true
    ud_pin:
      number: D5
      inverted: true
    initial_value: 0.01
    step_delay: 100us
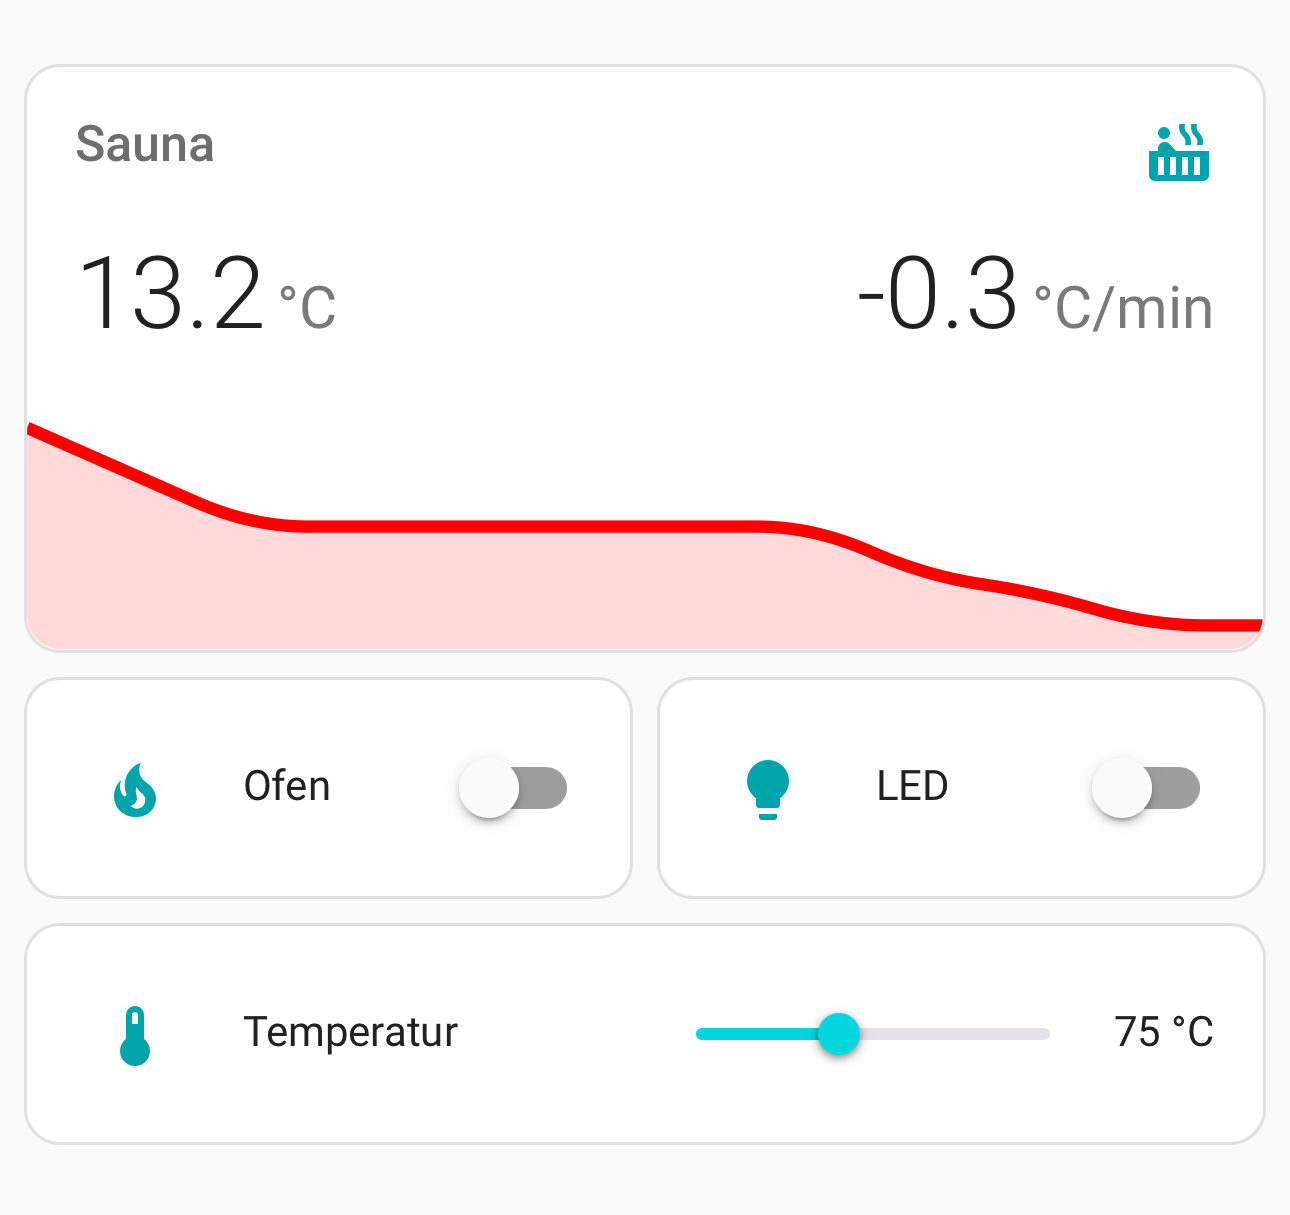
One little trick I added was this custom service in ESPHome, which allows me to set the sauna temperature directly via Home Assistant. But here’s the fun part: I didn’t want to just send raw potentiometer values—I wanted to send actual target temperatures in Celsius, like a normal human being. So, I wrote a set_pot_value service that takes a float value (e.g., 75°C), maps it to the 0.0–1.0 range expected by the digital potentiometer, and then sets it accordingly.
There’s even a bit of sanity checking baked in: if you try to set something outside the valid sauna range (55–105°C), the system politely declines with a nice angry log message. Because no one wants to accidentally steam themselves into another dimension.
Here’s the snippet that makes that work:
services:
  - service: set_pot_value
    variables:
      level: float
    then:
      - lambda: |-
          if (level < 55 || level > 105) {
            ESP_LOGE("custom", "Level out of range (65-105): %.2f", level);
          } else {
            float mapped_level = (level - 55) / 50.0;
            id(x9c_pot).set_level(mapped_level);
            ESP_LOGI("custom", "Setting temperature to %.2f °C (mapped level: %.2f)", level, mapped_level);
          }
And here’s how it looks in Home Assistant:
🧠 The Intelligence#
With ESPHome, I brought everything together in Home Assistant:
- A virtual switch to turn the sauna on/off (via the SSR)
- A temperature readout
- Automations to preheat the sauna or shut it off if someone forgets
- Ambient light effects that do more than look pretty
💡 LED Magic: A Sauna Hourglass#
Here’s where it gets delightfully nerdy. Instead of a clock or sand timer, I used a WS2812b strip to:
- Start with a warm, cozy yellow glow when you enter
- Gradually shift to green LED-by-LED over 15 minutes
- Indicate visually that sauna time’s up
Elegant. Simple. Hypnotic.
Also: not an excuse to procrastinate. I swear.
👀 Presence Detection: You Can Run But You Can’t Sit Still#
Motion sensors are fine… unless you’re in a sauna, where moving around isn’t exactly the point. So I used a microwave radar-based presence sensor, which detects you even if you’re sitting still, pondering life and sweating out sins.
If someone’s in the sauna, the LEDs stay on. If not, the system gracefully powers down. Spa-level luxury on a budget.
🧪 Lessons Learned#
- Four digipots are better than one.
- ESPHome is highly hackable if you’re willing to dive in.
- Microwave sensors are better than PIRs when your target is a human puddle.
- Making your own PCB is both terrifying and incredibly satisfying.
🤝 Want One?#
Thinking about sauna-fying your own smart home? Let’s talk! I’m happy to share code, schematics, and the ESPHome config—especially if it means saving more folks from fiddly knobs and sweaty timers.
Pro tip: If your sauna controller glows green, it’s either time to leave… or your sauna just achieved sentience and is judging your life choices.
Got questions, requests, or just want to swap sauna stories? Hit me up. Preferably before your next steam session.